Make Your Own Hiding
Place for Your Fish
I know once you read this you'll be thinking "it's so
simple". It makes me wonder why so many people
don't see that the pieces of decor in the pet shops aren't all that. I
mean why should anyone pay 20
plus dollars for a hiding place for their fish??? It's a slab of
thin rock with little rocks glued to it for legs.
The only thing you need to buy is aquarium sealer. A tube of the stuff
will cost you about 6 or 7 bucks.
And you should have some on hand any way, it's good stuff ! I did opt for buying
a fake rock as it was
about 9:30 at night and didn't feel like going to find any rocks. The fake
flat rock cost me 7 bucks.
The little rocks I will use for the legs I already had in the 55 gal tank for
decoration. So really all this
hiding place cost me was 7 bucks, as apposed to 20 plus dollars that you'll find
it costs at the pet stores.
Once again, this is one continuous
page for those of you that what to print off the steps.
Items you'll need:
1 - A nice flat rock that
will fit in your tank. The size of the rock is up to you.
2 - Smaller rocks to make "legs", I used 6 smaller rocks.
3 - Aquarium sealer.
4 - About 24 hours of time to let the sealer set properly.
Important Note:
DO NOT buy sealer that is not specifically made for
aquariums. Even if you go to
Homedepot or Lowes and the guy in the sealer isle says any sealer will do.
He swears on a stack of
bibles and claims he has built three 500 gallon fish tanks himself with household
window sealers. Anything but the
correct type of sealer (aquarium sealer) is toxic to your fish and WILL kill
them.
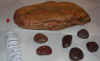
In the first picture below you see
the items needed. Notice the smaller rocks are not perfectly flat by any
means.
Doesn't matter, when we are done we'll have something that looks like Fred
Flintstone's coffee table. A slab
of rock with other rocks as the legs. Notice that there are six
small rocks. I plan to make only three legs, I
don't think it has to be an actual table per say. I need something my fish
can feel safe under, that's it.
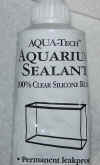
Below is a picture of the sealer tube so you can see not only does it say
aquarium sealer, it even has a
picture of an aquarium right on it. I'm betting my tube of sealer is ok
for this project. You'll only need
a small amount of sealer so notice in the picture above that the tube has been
used before and has a red
push pin inserted into the tube. I cut the opening for the tube small to
be able to control the sealer flow
better. A nice side effect is that I can use the pin to plug up the hole
to keep the sealer from drying and
hardening in the tube itself.
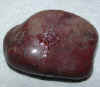
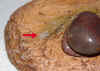
Ok, so in the picture below I've cleaned up all the rocks, dried them off
completely, and ready to put together
the first leg of the table. The rocks aren't perfect shapes, but like I
said, it does not matter. And you really
don't want a table in your tank anyway, that would just look weird. :-)
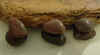
I imagined a table with 3 legs. Sitting in a triangle pattern. Sound
nice? I thought so. I'll seal 2 rocks together
so I have my 3 legs. I start the first leg by squeezing out a small amount
on one rock and place the other rock
on top of it (not rocket science, is it folks). The rocks not being flat
will slip, so I sealed them and then leaned
them up against the big flat rock to keep them in place.
After you have propped the legs up against the flat rock, let them sit for 2
hours.
Alright, you're almost done.
Place your rocks on your flat rock and position them where you want them
to be. Now use your sealer to seal the rock legs in place. Once
you've sealed them in place let the table
set for 24 hours. I know its a long time, but let the sealer cure right.
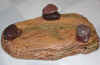
Here's a few pictures of my finished "table" in the tank.

Questions? or Comments?
Email me
CLICK HERE TO GO TO FISH PAGE
CLICK HERE TO GO
TO HOME PAGE