 |
|
|
Project date: 5/02/2004
Project: Sanding and buffing my 13 year old headlights
Project Time Duration: approx. 8 hours
Personal Satisfaction: Hell Yeah! " That means I
really liked the out come"
My truck is old, 13 years old to date.
I don't have any real big problems with it. And fix it up a little bit
more when I get the time and think of a project. I just wish I had more
time to wash the thing!
My headlights were turning yellow, pitted, and badly scratched. I decided
I should replace them seeing how safety is a big issue with yours truly.
And if you can't see in the dark while driving, you have a safety issue.
Seems the replacement headlights ( made of plastic) cost 100 bucks a
piece. Money grubbing bastards. It's a plastic box with a hole in it
for the light. Probably costs about 3 bucks to make. AND it's for a
13 year old truck. Not a new Lexus. It's the way of the world
folks...but doesn't mean one has to like it.
CLICK ON THE IMAGES TO SEE A LARGER IMAGE
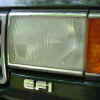
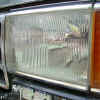
Ok, so just below is the before and after pictures. On the left is my
headlight in its old state. And on the right is the new and improved
light. Big difference huh. I couldn't wait to drive at night after
finishing this project. I've gotten back about 50% of my headlight
output. A very noticeable difference that makes me quiet happy about the
out come of this project.
|
 |
| Items
you'll need to sand and buff your headlights: A water source, a bucket or water hose A pack of assorted wet sand paper, course to ultra fine A buffer, a small one if possible Scratch removal wax, OR! toothpaste (yes I said toothpaste) Paper towels |
To begin with, you'll only see pictures here of the driver side headlight.
Because the other one looks the same and it saves on posting pictures and
wasting space.....so there.
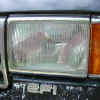
I got a bucket of water and went out to my truck. Pulled out the coarsest
sheet of wet sand paper I had and got busy sanding. Make sure you use
plenty of water, and good even circular movements. Don't press to hard,
you'll scratch the headlight to deep. Of course half way into this project
guess what, there ain't NO turning back. The assorted wet sand paper
pack I bought had four levels of coarseness. After going through each
level I had my sanded headlights. See pictures below.
 |
 |
So far I was happy with the sanding, even if only half
way done. Already it was an improvement over the yellow scratched lens I
had before.
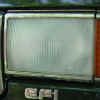
Next it was time to polish that baby to a nice clear glass looking lens. I
bought a scratch remover polishing compound from Wally Word. It worked ok,
but I was buffing and buffing with little results. I needed something that
was quicker. I remembered a good friend and co-worker telling me he knew
people that used toothpaste to do the same thing. I figured it couldn't
hurt. I used 3 parts toothpaste and 1 part scratch remover. It
helped keep the toothpaste from drying up to quickly. It worked
great. Just check out my headlight below.
 |
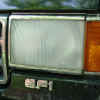
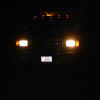
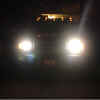
I took some night shots to see the difference.
Although they are not needed for myself. Like I said above, I got about
twice the amount of light coming from my headlights now, and it cost me roughly
about 15 bucks, not 200 like it would if I had bought replacement
headlights. I won't even say which set of pictures is the before and
after pictures, you'll see for yourself.
 |
 |
UPDATE!!!
two
nights after finishing this project I am on the road at midnight. I see a
deer just in time to come to a stop and not hit the deer. Had my
headlights been in their prior condition, I would have hit that deer. So
now I'm not up 200 bucks, but also a front end replacement and possibly a
hospital visit if that deer had gone through the windshield.