Wanting a better environment for
your fish? What serious fish hobbyist doesn't, right? I've
always thought one of those cool canister filters would be wicked awesome!
But talk about expensive. So, one day I start looking at what makes
those type of filters so expensive. Turns out they are expensive
because they work really well. And the makers charge for that level
of quality product. But the design of a canister filter is
simplistic!
So I've decided to build one, throw another project on the barbie mate!
And of course it can not be small. Oh no, uh uh, no way. This
filter will have to be able to filter out toxic waste should I decide to
drop some into my fish tank. And not kill a single fish.
Ok, so maybe not that good. But the final design will filter out the
water passing through the canister at a rate of 300 gallons per hour and
filtering down to the micron level. We're talking a unit that would
cost somewhere in the 550 dollar range on up. And I'm figuring it
will cost me around 50 to 70 bucks depending on the cost of supplies.
I guess another reason I'm doing this is to see if I can do it.
I know I can, the workings are so simple its funny. But I have to do
it, I don't know why. I have already improved on it a couple of
times. By the time its finished (I started the web page while
building it) it should be one serious piece of work...or complete shit.
We shall see!
Ok, so it's looking to be in the favor of a serious piece of work.
Which is cool, I hate when a project turns to shit. Not so much
that the project went south on me, but the time I wasted on it. And
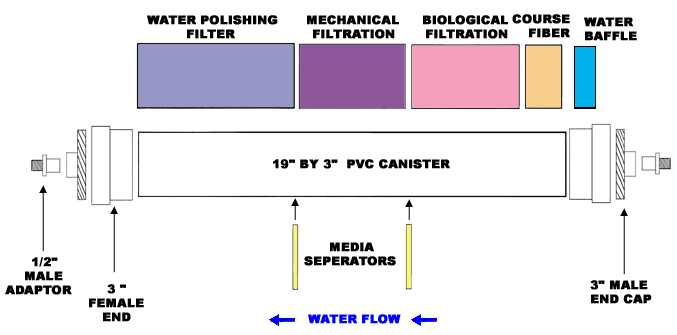
speaking of wasting time, I did up a diagram on the workings of the
canister filter, see it below.
|
|
| HOW IT WORKS
So you see the diagram above, if you're interested on how how a
canister filter works keep reading. If not, then go to the next step
to begin building your own.
Ok, a canister filter works like this, you push water through a
pressure tight system, in my case, a PVC tube. The water is forced
through different types of filtration media one at a time to remove as
many particles from the passing water as possible. Looking at the diagram
above, you see the different levels of filtration media the water will
pass through. Water will be pushed past the water baffle onto the
first filtration media.
The water baffle does nothing more than
dissipate the water stream to keep the larger waste from collecting
all at one point , thus clogging the filter.
The course fiber media filters
out large particles like uneaten food and fish poop.
The next level
of filtration is biological. this is accomplished by having the water pass
through porous ceramic material that after a good bacteria is established
on, will eat certain poisonous compounds, nitrates and ammonia. This level
of filtration is important as both nitrates and ammonia at high
levels in your fish tank will kill your fish.
Following the
biological filtration is mechanical and is done by passing the water past
a concentration of carbon. Carbon is not only porous
to trap waste particles but also has an attraction property that causes
waste particles to cling to the carbon.
The final filtration level,
the water polisher removes particles that are larger than a micron in
size. The end result...hopefully...being crystal clear water coming
from the filter and back into the fish tank.
Here's the finished picture of the canister filter, I was sanding the
threads on the intakes and got an idea to paint it up and make it look a
little "cooler", and thought it would be cool to use the bio hazard symbol
in there somewhere. Below is the end result. I like it.
|
ITEMS NEEDED FOR THIS PROJECT
Items you'll need for this project can vary. If you find something
better than listed below, by all means, use it.You need a canister of some sort. I used a 3" diameter length of
PVC pipe.
Because I used the PVC pipe I needed ends that would hold under pressure
and
got screw on end caps.
You need an inlet and outlet that won't fail under pressure. I used
PVC fittings with 1/2 inch male threads.
You need hosing, about 10 feet of it. I got 5/8 inch clear hosing.
PVC cement.
PVC knock out end caps.
Water pump, You'll see that when looking for a water pump there are many
to choose from, don't
worry too much about the amount of water it passes.
I say go small and if later you feel its not enough, upscale it.
Carbon, I chose large 64 oz. containers because I know I will use all of
it. And its cheaper to buy it in bulk.
Ceramic, This media is good in the fact that you only need to buy
it once.
You can wash it and start it over like knew if you so
choose.
Water Polishing Filter, I chose mine for its diameter, there are
others out there and
keep in mind your application's dimensions.
Course Fiber, I chose 3 inch diameter for a perfect fit in my PVC
tube.
Filter bags, you'll be cutting these up if you choose the PVC pipe
application. They just didn't
fit my PVC pipe correctly without
modifying it some what.
Scissors
Sewing thread
Something to cut with, saw, Dremel, jig saw
Aquarium sealant
A drill
|
| |
Below we have pictures of the pieces I used. Keep in mind you can
make your canister in any form you like. Should you come up with one
share with me. I'm sure there are different ways of going about this
that might be cheaper or just better than this way. It's my first
pass at it and could probably be done better.
|
So basically this is a PVC tube with end caps
that can be unscrewed to service the filter media within it.
I sanded down the 1/2 inch male PVC adapters threads for the 5/8
inch tubing to fit over nice and tight.
I then traced an outline of the adapter on the end cap to drill out
the hole I would need to shove the adpater
into. You can see the tracing in the middle picture below.
|
Below you'll see the knock out caps I bought and
modified to become the water baffle and media separators.
I sawed off the lips of any of the caps that were to be placed
inside the canister. I used my high tech steak knife
You can use what you deem useful to do your cutting with. I
then drilled a bunch of holes in the caps to serve
and water passages. I placed several of them together and on
one cap did not cut off the entire lip so it would
seat down into the tube and not slide in. I used some electric
wiring covered in aquarium sealer to protect it and
then made a handle to pull the water baffle out when its time for
servicing. The picture all the way to the right
is one of the inserts next to a filter mesh bag that will be cut up
and sewed around the insert to not allow lose
carbon particles to move around. |
Next I worked on the water polisher. I
found a filter that is for one of those expensive canister
filters, that has a diameter of 3 inches, perfect for my canister.
Notice the notches in the blue sealant. I cut those out to
allow water to pass around the blue lip. The water coming
from the filter media prior to the water polisher will actually go
into the polisher and get pushed outward through the water
polishing filter media. To do this I needed to plug up one
end of the water polisher. I cut out some Plexiglas pieces
and made a cap that would fit into one end of the water polisher
and have I lip to keep it from falling into the hole. I then
used a generous amount of sealant to "glue" it to the filter
itself. I drilled a hole and ran some tubing through it for
a nifty handle to pull it out when servicing it later. I
have since then made some modifications to it and added a coat
hanger wire to the handle to make it actually work. Turns
out the tubing stretched too much to be effective.
|
| Ok, at this point got got all arties fartise and
decided to paint the PVC. Below are the pictures. |
My my...is it time for the filtration media
already? I put the water polisher in first and worked my way
up to the water baffle. First thing you need to do is clean
your new media. Reason is because of the dust that it comes
in. Best to get that out now before trying to pass water
through it. Below you see the biological and mechanical media
being cleaned. You simply pour the media into a container and
run water over it. You'll see the dust turn the water color
and after you have rinsed the media a few times you are set.
|
| Here you see the media being inserted
one section at a time. The water polisher went in first.
Then one of the media separators was placed inside and the carbon
poured into the tube. I went with about 5 inches of carbon,
you decide how much you want to put in. I placed the other
media separator in and then poured in the biological media.
Next I used the course fiber and pushed it down on top of the
biological media. I then placed the water baffle on and wala!
All that is left to do is screw on the end caps and attach the 5/8
hose and pump.
|
NOTE: I used a lesser GPH pump as I realized
the passing of water through the canister filter does not need a
high rate of speed. It just has to pass the water through
continuously. The water is livable to the fish already, what
we are trying to accomplish here is to increase the purity of the
water to be clearer and more livable to the fish. |
| |
 |
|
| |
Got a cool idea or maybe a
question
Drop me an email! |
|
|