|
|
|
|
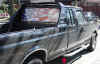
Installing Custom Back Up Lights
Don't be intimidated by this project. It's easier than it sounds.
The biggest thing you should worry about
is drilling holes into your car :-) I have an old truck and not to upset with
it having yet another hole in it. But
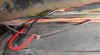
I can see if it was a newer car being worried a bit. Below is the end
result. See the small light mounted at
the front, towards the bottom of the truck bed? I mounted the lights there
instead of under the bumper so
I would have light not behind me but also on the sides as well.
|
|
|
|
Quick note:
Yes, the truck is dirty as hell, would have made for nicer pictures if it was
washed,
but just didn't feel like washing it right then and there. ;-)
Money Saving Tip!:
Electrical wire will cost you about 4 bucks for 25 - 28 feet. I found that
by buying
a spool of 100 feet, it only costs 8 bucks. Get twice as much for the same
price. If
you are like me, at some point...you WILL need the rest of it.
Items Needed
1 pair of Small Fog lights
drill and drill bits
2 brackets (I made mine out of some metal I had)
16 gage wire (can get from any auto parts store)
Electrical tape
Wire ties
Soldering gun and solder (not necessary but good idea)
Wire cutters or knife
Pliers
Screw driver
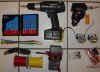
Alright, you got your stuff all together and ready to do the deed. Below
is a picture of needed
items. Notice that there is a multimeter, an item I thought I would need,
but didn't. The
project turned out easier than I had first thought.
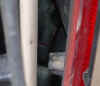
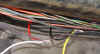
I needed to know which wire I would
need to splice into so that when the reverse lights came on so
would the new back up lights. I removed one of my tail lights to look
behind it and see what color
wire went to the reverse lights. In my case, it's the black with purple
stripe wire. Yours may be
different especially if your vehicle is not a Ford. See picture below for
wire needed.
You can mount the small fog lights on the body itself, I choose to make a
bracket to attach them.
I simply took a piece of metal and cut it up to be about the size I wanted.
In my case I had a
missing mud flap in the back so I yanked the other off and used it. I'll
get another set of mud
flaps down the road some other time.
So with newly made brackets in hand, I drilled 4 holes in each bracket. 2
for mounting the bracket
to the truck's body and 2 for the fog light mounting bracket. I then went
under my truck and placed
the bracket up against the inner wall where the bracket would be mounted.
I then drilled a pilot hole
for each of the holes that I would use to mount the bracket to the body.
Moved the bracket away
and drilled each hole all the way through.
Quick note:
Like I said, you can mount the lights to the body itself, same number of holes
would need
to be drilled. The reason I choose a bracket is for aiming proposes.
The fog light mount will allow
you
to move the light from side to side once mounted. But if you wanted to
move the fog light up and
down
you wouldn't be able to do so if the fog lights were mounted right to the
body. The added
bracket
will bend if need be to aim the light better.
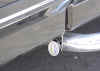
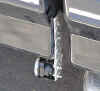
Ok, so we got that puppy mounted, looks good. It's small and out of the
way. See Below.
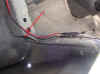
Now we need to wire that sucker for power. Remember I pulled back the tail
light and found the
wire that goes to the reverse lights. That wire runs underneath the length
of the truck all the way
up to the instrument panel into the cab of the truck. I found the wires
close to where I had mounted
the first fog light. I pulled the black with purple stripe wire away from
the rest of the wires as
well as the ground wire (which is always solid black). I striped back some
of the wiring on each to
connect my fog light wires to, see picture below.
The fog light kit came with a wire harness. The replacement bulbs for
these lights are all one
unit. It's not like you pull the bulb out and insert a new one. You
replace the bulb, the connector
and the wires. The harness is used to be able to disconnect and reconnect
the replacement bulb unit
quickly. So I connected the harness up to the wires coming from the fog
light and taped them up with
electrical tape.
I then cut the other end of the wires coming from the wire harness and pulled
off about an inch
worth of the rubber sleeve to expose bare wire.
I then ran these wires to the two wires I pulled and stripped back underneath
the truck, twisted them
around the appropriate corresponding wire. Your fog lights will have
either red and black wires or white
and black wires. The black wire is always the ground wire. The other
being the hot or positive wire.
The wires running
underneath the vehicle usually run up closer to the side of the driver. So
you'll
find one of the lights can be wired straight to the wires underneath. The
other light will need some
additional wiring spliced to it. I bought a spool of red and yellow, I
would have preferred red and
black, but the store was out of black. I found one of the wires for the
fog light on the
passenger
side would run all
the way to the wires underneath, the ground wire for the fog light wire harness
needed some extra
wire spliced to it. I measured out a few feet of wire and striped the end
to
twist it with the fog light's
harness end. I then soldered it and taped it tight.
I will also be soldering the wires from the fog lights to the wires underneath the
truck to make
them
permanent. But first I want to test them out to make sure I hooked them up
correctly.
Now if you just ran the light wires straight to the wires underneath to twist
them together and test
it out it is now time to run the wires underneath the body frame properly.
To properly run wires
underneath your vehicle you need to keep the wires as close to the body as
possible to prevent the
wires from snagging onto something while driving. You also want to make
sure they do not rub against
any sharp edges.
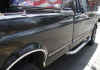
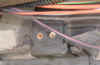
In my case I used cable ties to help pin up the wires closer to the body as seen
in the picture below.
I also had a spot that had a sharp edge that I couldn't get around. So what
I did was take some good
old duct tape and wrap several times around the wires that would be rubbing the
edge. I used lengths
of about 6 inches to wrap around the wires to ensure only the duct tapped parts
would be rubbing up
against the edges. And if clean enough, tape several strips of duct tape
to the edge itself.
Ok, so now the lights have been tested out. Time to make this deal set in
stone. I ran an extension
cord out to my truck and plugged in my solder gun. Soldered a big ole wad
of solder onto the
point where the wires from my fog lights are twisted together with the vehicle
wires I stripped.
It isn't pretty, but those wires aren't going anywhere!
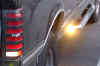
I tapped up the soldered points good and called it a done deal. The
picture below shows each fog light
on either side on. Notice the brightness of the new lights compared to
the factory tail lights.
|
|
|
![]()
Questions? Comments?
Got a cool idea you'd like to share?
Email Me!
Click Here to go to the
Build It page
Click Here to Go to Home Page